
Landing on an email blocklist can severely impact your email campaigns, causing lower open rates, higher bounces, and even revenue loss. This guide explains how email blocklists work, why they matter, and how to resolve and prevent blocklisting issues.
Key Takeaways:
- What are Blocklists? Databases that flag IPs or domains for spam-like behavior, used by email providers to filter messages.
- Why It Matters: Blocklisting disrupts email deliverability, damages sender reputation, and affects metrics like open and click-through rates.
- How to Check If You’re Blocklisted: Use tools like MxToolbox or monitor email performance for warning signs (e.g., bounce rate spikes or Gmail-specific issues).
- Common Causes: Poor email practices like sending to invalid addresses, high spam complaints, or misconfigured authentication protocols.
- Fixing Blocklisting: Clean your email list, fix SPF/DKIM/DMARC records, adjust sending behavior, and improve content quality.
- Requesting Removal: Submit a removal request with evidence of corrective actions through official blocklist channels.
By following these steps and maintaining good email practices, you can recover from blocklisting and safeguard your email deliverability.
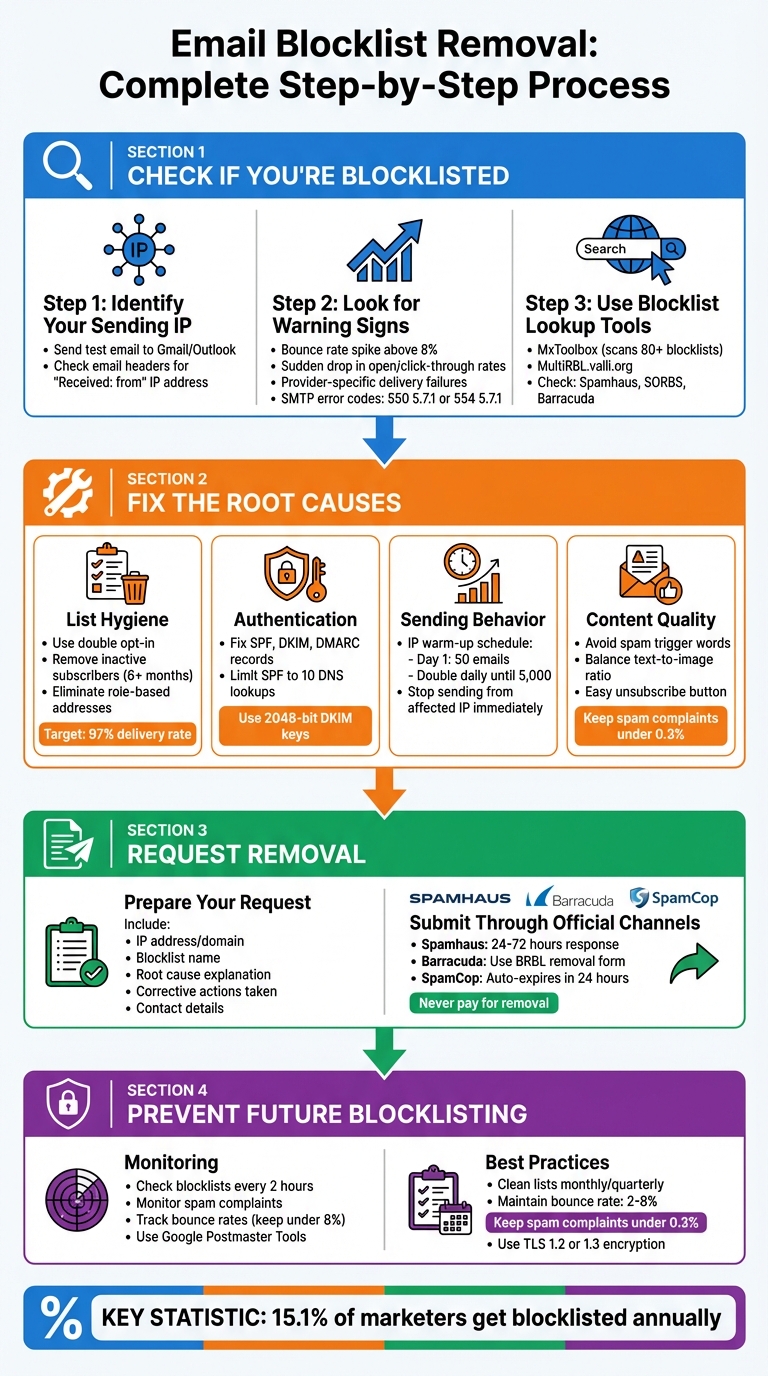
Email Blocklist Removal: Complete Step-by-Step Process
DOMAIN BLACKLISTS explained: How to avoid and remove yourself from domain blacklists
How to Check If You’re Blocklisted
To find out if your sending IP is on a blocklist, you first need to identify it. The easiest way? Send a test email to your personal Gmail or Outlook account. Then, check the email’s full headers to locate the "Received: from" IP address [4].
Warning Signs of Blocklisting
Often, your email metrics will give you clues about blocklisting before you even perform a lookup. For instance, a sudden drop in open and click-through rates could mean your emails are landing in spam folders – or worse, getting blocked entirely. If your bounce rates spike above 8%, it might point to blocklisting or issues with your email list hygiene [5].
Delivery hiccups with specific providers are another red flag. For example, if your emails reliably reach Yahoo inboxes but consistently fail with Gmail users, you could be dealing with a provider-specific blocklist. Check your SMTP bounce logs for error messages like 550 5.7.1 (Service unavailable; Client host blocked) or 554 5.7.1 (Message rejected due to IP reputation) [4].
"One of the first signs that your email has been blocklisted is lower open rates and a sudden increase in bounces." – Amy Elliott, Content Writer, MailerCheck [1]
Segmenting your subscribers by email provider (e.g., Gmail, Outlook, Yahoo) can help you pinpoint whether the issue is isolated to certain networks. Tools like Google Postmaster Tools and Microsoft SNDS can also give you insights into your sender reputation that aren’t visible on public blocklists.
Blocklist Lookup Tools and Methods
If you suspect blocklisting, multi-RBL aggregators are your best bet for a quick check across multiple databases. Tools like MxToolbox can scan your IP against more than 80 major blacklists [4], while MultiRBL.valli.org offers historical DNSBL data [4]. These tools can save you time compared to manually checking individual blocklists like Spamhaus, Barracuda, or SpamCop.
To stay ahead of potential issues, consider using automated tools that scan blocklists frequently – some as often as every two hours – and send you alerts [1]. MailMonitor, for example, provides real-time blocklist monitoring and actionable insights, helping you track your IP and domain reputation across major databases.
A "Listed" status on prominent blocklists like Spamhaus, SORBS, or Barracuda signals a critical issue for your email deliverability [4]. Even listings on lesser-known blocklists, while potentially less impactful, still require attention. Some blocklists even provide impact scores to help you gauge how severely a listing could affect your reputation [6].
"One listing can damage your sender reputation – especially for Gmail, Yahoo, and Outlook." – MailChannels [4]
Once you’ve confirmed your blocklist status, you’re ready to take steps to resolve and remove the listing.
Why You Get Blocklisted and How to Fix It
Main Reasons for Blocklisting
One common reason for getting blocklisted is poor list hygiene. Sending emails to invalid addresses can trigger spam traps. These traps include "recycled" traps (old email accounts repurposed by ISPs) and "pristine" traps (addresses created solely to catch spammers) [2][9].
Another major issue is high spam complaint rates. Providers like Gmail and Yahoo expect bulk senders to maintain spam complaint rates below 0.3% [2]. When users mark your emails as spam rather than unsubscribing, it signals to mailbox providers that your content is unwanted. Technical misconfigurations also play a role. For example, missing or incorrect SPF, DKIM, or DMARC records – or exceeding the SPF limit of 10 DNS lookups – can lead to blocklisting [8][3].
Sending behavior anomalies can raise red flags, too. Sudden spikes in email volume, inconsistent sending patterns, or failing to properly warm up a new IP address can all lead to trouble [7][8]. Content-related issues, like using spammy keywords, sending image-only emails without text, or including broken HTML, can also trigger spam filters [7][8]. Lastly, security breaches – such as hacked accounts or malware-infected systems sending bulk emails – are frequent culprits [3].
"You shouldn’t try to get delisted from a blocklist until you have actually fixed whatever landed you there in the first place. Otherwise, you’ll just get put right back on it again." – Travis Walton, Associate Product Manager, Sinch Mailgun [2]
Recognizing these issues is the first step toward resolving blocklisting problems.
How to Fix Blocklisting Issues
Clean your email list. Use double opt-in to filter out typo traps and fake addresses [7][9]. Adopt an engagement-based sunset policy, removing or re-engaging subscribers who haven’t interacted with your emails in six months [8][9]. Eliminating role-based addresses (e.g., @support or @info) can also reduce spam complaints. Email deliverability tools can help you achieve delivery rates of around 97% [7].
Fix your authentication protocols. Check that your SPF, DKIM, and DMARC records are correctly configured and up to date [8][3]. Review server logs for SMTP error codes: 550 5.7.1 indicates a policy block, 421 4.7.0 points to rate-limiting, and 554 5.7.5 signals spam filter rejection [8]. Tools like Google Postmaster and Microsoft SNDS can help you monitor your domain reputation and detect spam trap hits [8].
Adjust your sending behavior. For new IP addresses, warm them up gradually – start with 50 emails on Day 1 and double the volume daily until you hit 5,000 emails, focusing only on engaged users [8]. If already blocklisted, stop sending from the affected IP or domain immediately. Focus on your most engaged subscribers while you work to rebuild your reputation [10].
Improve your content quality. Avoid spam trigger words, maintain a balanced text-to-image ratio, and use branded URLs [1]. Make your unsubscribe button easy to find – it’s better for users to opt out than to report your email as spam [7][12]. Additionally, connect to ISP feedback loops to automatically suppress contacts who mark your emails as spam [10].
"Best practices will produce best results." – Travis Walton, Associate Product Manager, Sinch Mailgun [2]
With these steps in place, you’ll be ready to request removal from a blocklist effectively.
sbb-itb-eece389
How to Request Blocklist Removal
Preparing Your Removal Request
The first step? Stop sending emails from the affected IP or domain immediately. Continuing to send emails while blocklisted can worsen your reputation and make the delisting process tougher.
Use tools like MXToolbox or Spamhaus Reputation Checker to confirm the blocklist and pinpoint the cause. Collect technical evidence such as your mail server IP address, domain name, email headers, and server logs. These details can help identify unusual sending patterns or suspicious activity. Double-check that your SPF, DKIM, and DMARC records are properly set up to ensure your emails are recognized as legitimate.
Document every corrective action you’ve taken. Create a concise summary, like: "removed 5,000 inactive subscribers" or "patched a server vulnerability."
"Getting off a blacklist is not just about the request itself, but about proving you are a trustworthy sender."
- Matthew Whittaker, Co-founder & CTO, Suped
When drafting your removal request, include the following:
| Information to Include | Required Details |
|---|---|
| IP Address/Domain | The specific IP or domain that is listed. |
| Blocklist Name | The exact list (e.g., Spamhaus SBL, Barracuda). |
| Root Cause | What caused the listing (e.g., spam trap hit, compromised account). |
| Corrective Actions | Steps taken to resolve the issue and prevent recurrence. |
| Contact Details | An email and phone number for follow-up. |
Once you’ve compiled all the necessary information and outlined your corrective actions, you’re ready to submit your request.
Submitting Your Removal Request
Always submit your request through the blocklist’s official website or verified delisting form. Never pay for removal – services like Spamhaus provide delisting for free. Be cautious of scams offering paid removal services.
Maintain a professional and polite tone in your communications. Clearly explain your situation and the steps you’ve taken to resolve the issue. Avoid exaggerating or misrepresenting your actions, as dishonesty can delay the process.
"Be open and honest about your situation, and you’ll more likely be granted the removal!"
- Amy Elliott, Content Writer, MailerCheck
Don’t flood the blocklist with multiple requests for the same issue. For example, Barracuda may delay processing if you submit duplicate requests. If you’re using a shared IP, notify your Email Service Provider (ESP) first – they manage the reputation of the IP pool and may need to handle the request on your behalf.
Most major blocklists process removal requests quickly, often within 24 hours. Next, follow the specific steps for major blocklists.
Removal Processes for Major Blocklists
Here’s a quick guide to the delisting process for some of the most common blocklists:
- Spamhaus: Protecting over 3 billion mailboxes globally, Spamhaus typically responds to removal requests within 24 to 72 hours [14]. For the Spamhaus SBL (Spamhaus Block List), you may need your ISP or ESP to initiate the request. For the DBL (Domain Block List) or PBL (Policy Block List), use their automated Blocklist Removal Center. Spamhaus won’t delist your IP or domain until the root cause of the listing has been resolved.
- Barracuda: Complete the BRBL removal form, providing your IP address, email, and phone number. Avoid submitting multiple requests, as it can slow down processing.
- SpamCop: Listings here often expire automatically within 24 hours if the problematic activity stops. Since SpamCop doesn’t accept manual removal requests, simply halt the offending behavior and wait for automatic delisting.
- Private Blocklists: For blocklists managed by mailbox providers like Gmail, Microsoft, or Yahoo, you’ll need to contact their postmaster teams or use their internal delisting portals.
"If you request delisting from a blocking service, and don’t do anything to change the behavior that caused the listing in the first place, you should expect to be blocked again."
Monitoring and Preventing Future Blocklisting
Using MailMonitor for Blocklist Monitoring
Keeping a close eye on your email deliverability is critical, and MailMonitor makes this process seamless. It automatically checks major blocklists, like Spamhaus, Barracuda, and SpamCop, every two hours and sends instant alerts if your IPs or domains are flagged [1]. This allows you to act quickly, whether the issue stems from your sending infrastructure or your brand identity. Beyond blocklist monitoring, MailMonitor evaluates key reputation metrics – such as spam complaints, hard bounce rates, and spam trap hits (including pristine, recycled, and typo traps) – to help you spot and resolve list hygiene problems early [2].
The platform also provides deliverability audits to test your email campaigns against spam filters before sending. Additionally, MailMonitor offers IP warm-up tools to help you gradually build a strong sender reputation [16].
"Your email reputation is one of the most important scores for an email marketer to monitor."
- MailMonitor [16]
For a deeper dive into your reputation, MailMonitor integrates with resources like Google Postmaster Tools and Microsoft SNDS. Their managed services even include expert consultations to help optimize your email practices [13][15]. While monitoring is key, taking proactive steps ensures long-term deliverability success.
Best Practices to Avoid Blocklisting
Monitoring is just one part of the equation. To reduce your chances of being blocklisted, consider these essential practices:
- Keep your email lists clean: Regularly remove hard bounces and inactive subscribers. Using verification tools monthly or quarterly can help you catch recycled spam traps and maintain list hygiene [15]. Aim to keep bounce rates between 2% and 8%; rates above 8% can significantly increase your blocklist risk [5]. Additionally, spam complaint rates should stay under 0.3%, as required by major providers like Gmail and Yahoo [2].
- Authenticate your emails properly: Set up SPF, DKIM, and DMARC records to prove your emails are legitimate. For example, limit SPF records to 10 DNS lookups, use 2048-bit keys for DKIM signatures, and ensure all sending IPs have valid PTR (reverse DNS) records. Using TLS encryption (version 1.2 or 1.3) for email transmissions is also recommended [8].
- Warm up new IPs gradually: Avoid sudden spikes in email volume from new IPs, as this can lead to blocklisting. Instead, increase sending volumes slowly. If you’re sending under 100,000 emails per month, consider using a shared IP to benefit from its established reputation [10][15].
"In today’s digital landscape, where email deliverability is more and more important, landing on a blocklist can be detrimental to your ability to get messages in front of your subscribers. By proactively monitoring and addressing blocklist issues as they arise, you can safeguard your reputation, maintain customer trust, and ensure your messages aren’t automatically flagged as spam by ISPs."
- Kate Nowrouzi, VP of Deliverability, Sinch Mailgun [17]
Conclusion
Getting blocklisted is more of a wake-up call than a death sentence for your email program. To resolve it, start by identifying which list you’re on, address the root cause, and then submit a formal request for delisting [1][2].
It’s always better to prevent problems than to fix them later. Around 15.1% of marketers reported being blocklisted over a 12-month period [11]. Interestingly, even "successful" email programs face nearly the same risk (15.0%) as those considered less successful (16.5%) [11]. This highlights that blocklisting can happen to anyone, no matter their experience or track record.
The practices shared in this guide are essential for building a strong and reliable email strategy.
"If you do get blocklisted, use it to change the way things are."
- Ivanka Simovic [11]
Blocklists are designed to protect users from spam and harmful content, not to penalize genuine senders [5][3]. Keeping this in mind can help you approach the delisting process constructively. Focus on fixing the issues and proving your credibility. By staying vigilant and following sound email practices, you can maintain strong deliverability and ensure your messages land in the inbox where they belong. Incorporating these measures will help you create a durable email strategy that minimizes the risk of future blocklisting.
FAQs
How can I check if my email address or domain is on a blocklist?
To see if your email address or domain has landed on a blocklist, you can rely on real-time monitoring tools that keep tabs on blocklists and send alerts. Tools like MailMonitor simplify this by scanning more than 100 blocklists and notifying you immediately if your email or domain gets flagged.
Alternatively, you can manually check well-known blocklists, such as Spamhaus, to determine if your IP or domain is listed. Catching a blocklist issue early lets you act swiftly to safeguard your email deliverability.
How can I avoid being added to a blocklist in the future?
To maintain a strong email-sending reputation and steer clear of blocklisting, stick to these best practices:
- Use verified email lists to ensure you’re reaching active and valid recipients.
- Set up email authentication protocols like SPF, DKIM, and DMARC to establish credibility with email providers.
- Regularly clean your email lists by removing contacts that are inactive or pose a risk.
- Keep an eye on your sender reputation and address any potential issues promptly.
- Practice responsible sending methods, such as gradual IP warming and sticking to a consistent email schedule.
By taking these steps, you can help ensure your emails land where they belong – in recipients’ inboxes.
How can I request removal from an email blocklist?
If you find your IP address or domain on an email blocklist, the first step is to confirm the listing. Use tools that check popular blocklists like Spamhaus, Barracuda, or Gmail. Once you identify the blocklist, you can begin the removal process.
Here’s what you’ll typically need to do:
- Fix the root cause: Investigate why you were listed. Common reasons include spam complaints or improperly configured email settings. Address these issues before proceeding.
- Follow the blocklist’s removal process: Visit the blocklist’s website and locate their delisting instructions. This often involves filling out a form and, in some cases, providing proof that the issue has been resolved.
To prevent being listed again, stick to best practices for email management. This includes keeping your mailing lists updated and avoiding behaviors that could trigger spam filters.
