Your domain’s reputation directly impacts email deliverability. End up on a blacklist, and your emails might bounce, land in spam, or vanish entirely. Blacklists, like Spamhaus or Barracuda, flag domains and IPs linked to spam, phishing, or malware. Here’s what you need to know:
- Why it matters: Blacklisting can disrupt business-critical emails (e.g., invoices, password resets), leading to lost revenue and frustrated customers.
- How it works: Blacklists check sender IPs, domains, and URLs for suspicious activity. Listings can happen quickly due to issues like spam complaints, poor email list hygiene, or compromised infrastructure.
- Types of blacklists: Focus varies – some target IPs (DNSBL), others domains (RHSBL), or even URLs in email content (URIBL).
- Prevention tips: Use SPF, DKIM, and DMARC for authentication. Keep email lists clean, monitor engagement metrics, and warm up new domains gradually.
- Fixing issues: Stop sending, identify the problem, and submit a delisting request once resolved.
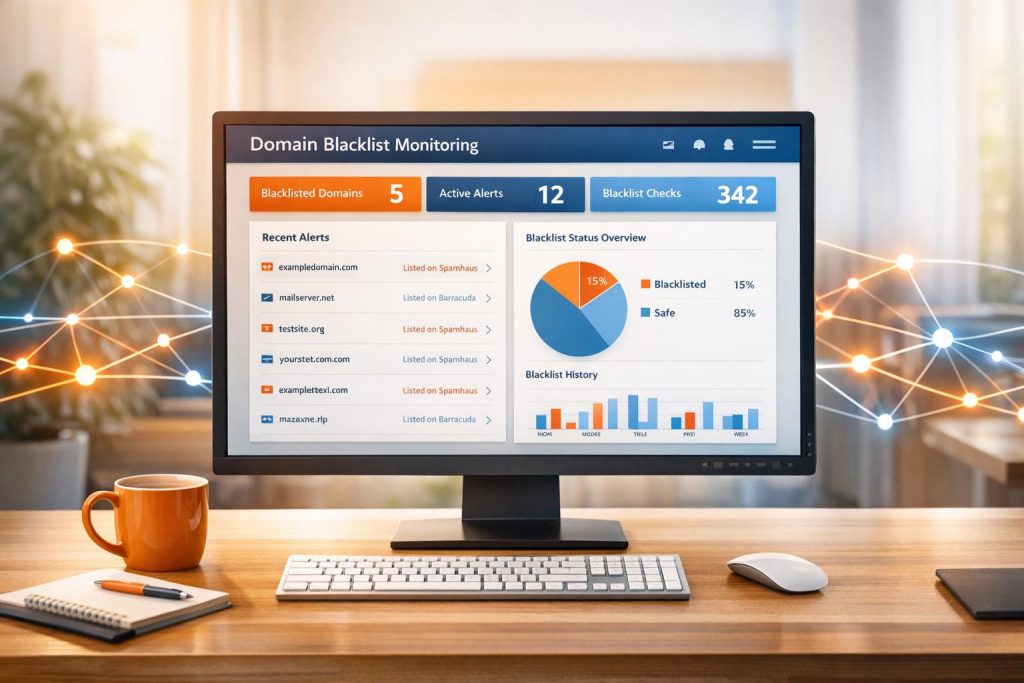
Automated tools like MailMonitor can help. They scan over 60 blocklists, send real-time alerts, and track your sender reputation to minimize risks. Proactive monitoring ensures your emails reach inboxes, not spam folders.
How to avoid email blacklists: IP & domain checks you must know
Types of Domain Blacklists and Why Domains Get Listed
Types of Domain Blacklists and Their Detection Criteria
Main Types of Domain Blacklists
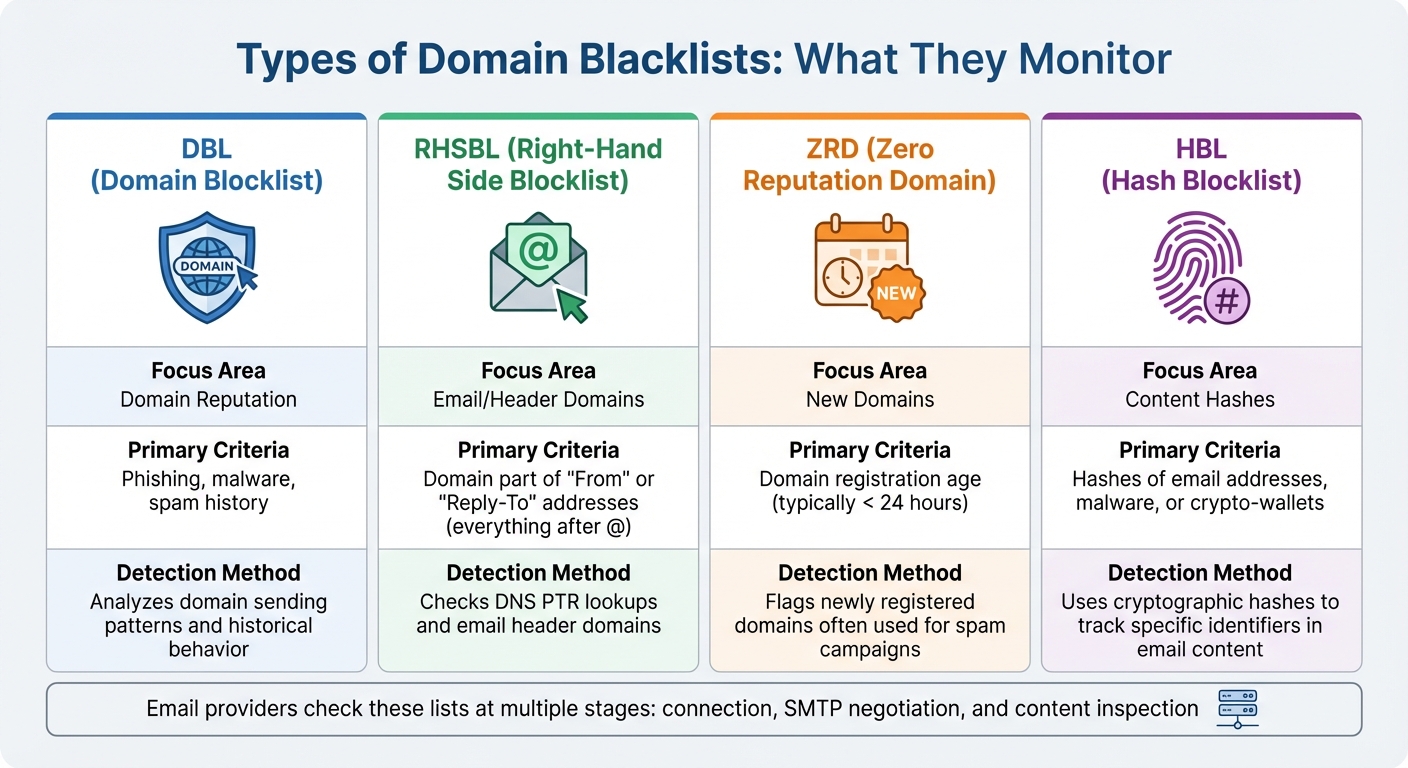
Domain blacklists operate in different ways, and understanding their nuances is crucial for effective monitoring. Right-Hand Side Blocklists (RHSBL) focus on the domain part of an email address – everything after the "@" symbol – or on domains found in DNS PTR (reverse IP) lookups [7][1]. These lists are particularly useful for detecting spoofed or malicious senders by analyzing the "From" or "Reply-To" fields.
Zero Reputation Domain (ZRD) lists flag newly registered domains, as these are often weaponized immediately for spam or phishing campaigns. Meanwhile, Hash Blocklists (HBL) use cryptographic hashes to track specific identifiers like email addresses, malware files, or Bitcoin wallet addresses found in email content. Both ZRD and HBL are powerful tools for early detection of harmful activity [3][8]. Additionally, policy and reputation lists identify domains based on registration patterns, such as specific registrars or geographic regions [1]. As RFC 6471 highlights:
DNSBL operators are free to choose whatever listing criteria they wish, as long as those criteria are clearly and accurately communicated. [1]
| List Type | Focus Area | Primary Criteria |
|---|---|---|
| DBL | Domain Reputation | Phishing, malware, spam history [4][8] |
| RHSBL | Email/Header Domains | Domain part of "From" or "Reply-To" addresses [7][1] |
| ZRD | New Domains | Domain registration age (typically < 24 hours) [3][8] |
| HBL | Content Hashes | Hashes of email addresses, malware, or crypto-wallets [3][8] |
Now, let’s delve into why domains end up on these blacklists and the common triggers that can harm a sender’s reputation.
Common Reasons Domains Get Blacklisted
Domains usually get blacklisted due to specific triggers. One major cause is poor list hygiene. When hard bounce rates exceed 2–3%, it signals poor-quality email lists or the use of unverified addresses [9][10]. A sudden surge in email volume – like a 10× increase – can also raise red flags [9].
Another common reason is compromised infrastructure. Hackers often exploit email accounts or servers to send out malware, phishing emails, or botnet-driven spam. Malicious URLs embedded in email content can also lead to your domain being flagged on URI-based blacklists [9][10]. Matthew Whittaker, Co-founder & CTO at Suped, emphasizes this risk:
The primary goal of SURBL… is to identify and list domains found in unsolicited bulk emails (spam) and phishing attempts. This includes URLs used to host phishing sites, exploit kits, or even just redirect users to other spammy destinations. [10]
To avoid these pitfalls, implementing double opt-in (DOI) can significantly reduce the chances of hitting spam traps by verifying that every email address on your list is valid and consented. Keeping hard bounce rates below 2% and regularly auditing the URLs in your email templates are also key preventive steps [9][10].
How Email Providers Use Blacklists
Email providers rely on blacklists at multiple stages of email filtering, which underscores the importance of staying ahead with proactive monitoring. During the connection phase, providers check IP-based DNSBLs. At the SMTP negotiation stage, they reference DBL and ZRD lists for HELO and "MAIL FROM" domains. Finally, during content inspection, they use URIBL, SURBL, and HBL to scan URLs and attachments [3][4]. This layered approach ensures maximum filtering accuracy. As the Spamhaus Team explains:
The key to email filtering is to remove the bulk of unwanted emails right at the beginning of the process before they reach the resource-intensive content inspection stage. [3]
How to Monitor Domain Blacklists Effectively
Automated Monitoring Tools and Techniques
Start by keeping track of all your sending domains, subdomains, and IP addresses (both IPv4 and IPv6) in one centralized system. This is crucial because manual checks alone can’t handle the complexity of high-volume email operations. A single listing on a major database could block emails across thousands of mail servers worldwide [11][12][14][2][15].
The best way to stay ahead is by using automated DNSBL lookups. These tools continuously query major Real-time Blackhole Lists (RBLs), which are key to identifying potential blacklist issues. With over 700 public DNSBLs available, advanced tools monitor your domain and IP status across more than 200 blacklists [1][14]. They perform checks at critical stages: when the connection is established (connecting IP), during the pre-data phase (HELO string and MAIL FROM domain), and in the post-data phase (domains in the email body or attachments) [3].
To respond quickly to any issues, set up real-time alerts via email or webhooks to platforms like Slack or Discord [11][12]. Some tools even assign "impact scores" to blocklists, helping you prioritize the most urgent problems [12]. For example, MailMonitor combines blacklist monitoring with reputation tracking and inbox placement testing, offering a complete picture of how blacklist status affects your email performance. Pairing these automated checks with other data sources makes your monitoring strategy even stronger.
Combining Monitoring Data Sources
Blacklist monitoring alone doesn’t give you the full picture. To understand your domain’s overall health, combine multiple data sources. For instance, pairing DNSBL lookups with bounce logs can uncover delivery failures that often occur before a blacklist listing happens [5]. Additionally, monitoring engagement metrics like open rates, click rates, and complaint rates can help you spot potential problems early on [5].
A well-designed monitoring dashboard should display all key signals, including bounces, spam traps, complaints, full inboxes, and hard failures [13]. It’s also important to ensure your SPF, DKIM, and DMARC records are correctly configured, as authentication failures are a common reason for blacklist listings [5][6]. Advanced services can monitor over 60 blocklists around the clock while also keeping track of your authentication status [6].
| Monitoring Component | Data Source / Metric | Purpose |
|---|---|---|
| DNSBL Lookups | RBL/DNSBL Databases | Detects if an IP/domain is flagged for spam [11] |
| Sender Score | Return Path Provider Network | Measures overall trustworthiness (0–100) [5] |
| Engagement Data | Open, Click, & Complaint Rates | Identifies shifts in recipient behavior [5] |
| Bounce Logs | Rejected/Accepted Rates | Tracks delivery failures (hard/soft bounces) [5] |
| SMTP Handshake | HELO/rDNS Matching | Detects spoofing or misconfiguration [3] |
By layering these data sources, you’ll gain a more complete understanding of your domain’s health and can act proactively to address issues.
Setting Up a Monitoring Schedule
Once you’ve established layered monitoring, align your monitoring frequency with your sending volume and risk level. For high-volume marketing domains, schedule checks every 30 minutes to 3 hours to catch problems before they disrupt major campaigns [11]. Lower-volume domains may only need checks every 12 hours or once a day [11]. As WebsitePulse advises:
Regular automated checks, at least every few hours, are best for timely detection and quick response. [2]
For critical communications – like contracts or proposals – real-time monitoring is essential [15]. Early detection is key because fixing reputation issues, often reflected in sender scores (rated from 0 to 100), can take weeks [5]. Using comprehensive blacklist monitoring tools can reduce email bounce rates by up to 21% [13].
To further protect your email reputation, separate your mail streams by using different subdomains for marketing and transactional emails. This way, a blacklist issue with promotional content won’t interfere with crucial messages like password resets or order confirmations [5]. For campaign-based senders, it’s a good idea to supplement automated monitoring with manual checks before and after major email blasts to ensure everything runs smoothly [15].
sbb-itb-eece389
Preventing and Resolving Domain Blacklist Issues
Preventing Blacklisting Through Proper Configuration
Avoiding blacklisting starts with solid technical authentication. Set up SPF, DKIM, and DMARC records to prove your emails are legitimate and to block spoofing attempts [16][17]. For subdomains that don’t send emails, use a v=spf1 -all record, and ensure your reverse DNS (rDNS) matches your HELO domain to prevent connection issues [3].
Maintaining a clean email list is just as important. Use double opt-in to confirm that subscribers genuinely want your emails, and aim to keep bounce rates below 2% [16][5]. As Grant Ammons, Founder of Truelist.io, explains:
A single opt-in proves interest, but a double opt-in proves intent. That distinction is everything to an inbox provider [16].
Hitting even one spam trap can increase your chances of being flagged by Spamhaus by over 70% [16].
Gradually warm up new domains. Sending large volumes of email from a new domain too quickly can raise your blacklisting risk by more than 60% [16]. Start with smaller volumes and increase gradually over several weeks. A proper warm-up process can improve deliverability rates by 35-50% within two months [16]. Keep spam complaints below 0.1% (1 complaint per 1,000 emails), as higher rates often lead to immediate blacklisting [16].
Steps to Take When Your Domain Gets Blacklisted
If your domain ends up on a blacklist, the first step is to stop sending emails and identify the root cause. Travis Walton, Associate Product Manager at Sinch Mailgun, advises:
You shouldn’t try to get delisted from a blocklist until you have actually fixed whatever landed you there in the first place. Otherwise, you’ll just get put right back on it again [18].
To find out which blacklist flagged you, use lookup tools from major operators like Spamhaus, Barracuda, or Spamcop [18][19]. Immediately review your logs and authentication records to pinpoint the issue [18][20]. Common causes include compromised scripts, poor list hygiene, or high complaint rates. Once you’ve resolved the problem, submit a delisting request through the blacklist’s official form [18][19]. Be clear about the steps you’ve taken to fix the issue and provide accurate contact details. Depending on the process, removal can take anywhere from 2 to 7 days [1].
Confirming Recovery and Avoiding Future Listings
After being delisted, it’s crucial to ensure your domain is fully cleared. Run fresh DNSBL lookups across major blacklists and monitor your email delivery metrics for at least two weeks. Keep an eye on bounce and complaint rates to make sure they stay within acceptable limits [18]. For Gmail-specific metrics, Google Postmaster Tools is an excellent resource to track domain reputation and authentication status [16].
Tools like MailMonitor can help confirm your recovery by combining blacklist monitoring with real-time inbox placement testing. This ensures your emails are not only passing technical checks but also landing in recipients’ inboxes. To avoid future issues, stick to double opt-in practices, maintain high engagement, and monitor your authentication records daily. As Kate Nowrouzi, VP of Deliverability at Sinch Mailgun, emphasizes:
By proactively monitoring and addressing blocklist issues as they arise, you can safeguard your reputation, maintain customer trust, and ensure your messages aren’t automatically flagged as spam by ISPs [19].
Staying vigilant and proactive is the key to keeping your emails out of spam folders and maintaining strong deliverability over the long term.
Advanced Domain Reputation Management Techniques
Using DMARC Reporting to Protect Your Domain
DMARC reporting gives you a clear view of all IP addresses and services sending emails on your behalf. This insight helps you separate genuine third-party tools – like your marketing platform or billing system – from unauthorized spoofing attempts. Considering that billions of fraudulent emails are sent daily [22], having this level of visibility is crucial.
To start, implement a p=none policy. This allows you to collect data without the risk of legitimate emails being rejected. Since DMARC reports are delivered in XML format, it’s helpful to use monitoring tools that convert these reports into actionable dashboards. These dashboards can pinpoint authentication issues and help you address them efficiently [21]. As Jack Zagorski from DMARCeye notes:
"Monitoring DMARC isn’t just about fixing technical errors; it’s about maintaining trust in your domain, keeping your emails out of spam folders, and staying compliant with Google and Yahoo’s new sending standards." [21]
Once you’ve identified all legitimate email senders, you can move to a "quarantine" or "reject" policy to block malicious activity. This step is critical, especially since providers like Google and Yahoo will require bulk senders to have DMARC records and maintain low spam rates by 2025. Additionally, spikes in DMARC failures or unauthorized IP activity can serve as early warnings, helping you address issues before your domain gets blacklisted. For added security, consider using separate subdomains for different email streams (e.g., transactional versus promotional) to safeguard your domain’s reputation. By combining DMARC insights with seed testing, you can further verify your inbox placement and gain a full view of your email deliverability.
Combining Seed Testing with Reputation Monitoring
Seed testing and reputation monitoring work hand-in-hand to give you a complete understanding of your email deliverability. Reputation monitoring keeps track of your domain and IP status across more than 60 global blocklists, sending instant alerts if any issues arise [6]. Meanwhile, seed testing measures how often your emails land in inboxes versus spam folders using test accounts across major providers [23].
This method is especially useful now that privacy features obscure traditional open rates. Seed testing provides an independent way to gauge deliverability. Roman Kozłowski, an email marketing expert at MessageFlow, advises:
"Triangulate multiple signals. Watch for an abrupt, disproportionate drop in in-box opens or panel-based opens (seed/test accounts) that cannot be explained by creative or targeting changes." [23]
Set your reputation monitoring to check every 30 minutes to 12 hours, and enable automated alerts via webhooks or email for any changes in status [11]. You can also add unique seed addresses directly to your Email Service Provider subscriber lists to test each campaign automatically [6]. Monitoring the percentage of emails delivered within 60 minutes can provide additional insights – a rising delay curve might indicate throttling or blocking [23].
How MailMonitor Supports Advanced Monitoring
MailMonitor simplifies these advanced techniques by offering a platform that integrates monitoring and deliverability management. It continuously tracks your domain and IP status across major blocklists and runs inbox placement tests to ensure your emails reach recipients’ primary inboxes instead of spam folders.
The platform sends custom alerts if your domain appears on a blocklist or if inbox placement rates drop. Its ISP monitoring feature shows how different providers handle your emails, while infrastructure monitoring ensures your SPF, DKIM, and DMARC records are correctly configured. Beyond monitoring, MailMonitor provides managed services like blocklist removal, DMARC implementation, and ongoing deliverability consulting to help you maintain your domain’s reputation and keep your emails where they belong – in your recipients’ inboxes.
Conclusion
Keeping a close eye on domain blacklists is essential. Even a single listing on a major database like Spamhaus can block your emails from reaching thousands of mail servers [2]. What’s more, these listings often occur without any obvious error messages [24]. As Simon Rodgers, Digital Marketing Expert at WebSitePulse, explains:
"Monitoring your blacklist status protects more than deliverability; it protects your brand." [2]
By following the strategies outlined earlier, you can maintain strong email performance. Practices like automated monitoring, implementing authentication protocols (SPF, DKIM, and DMARC), maintaining clean email lists, and combining reputation checks with seed testing all work together to ensure your emails land in inboxes. Detecting issues early can highlight deeper problems, such as compromised accounts or malware abuse, allowing you to address them before they impact deliverability and revenue [2][19].
For a seamless approach, MailMonitor provides an all-in-one solution for continuous monitoring. It automates blacklist checks across major databases and sends instant alerts with actionable insights. The platform also integrates reputation monitoring, inbox placement testing, and infrastructure assessments into a single dashboard, saving you from the hassle of manually tracking multiple sources. With additional services like blocklist removal and DMARC implementation, MailMonitor offers expert guidance to help protect your domain’s reputation.
Kate Nowrouzi, VP of Deliverability at Sinch Mailgun, highlights the importance of staying ahead:
"By proactively monitoring and addressing blocklist issues as they arise, you can safeguard your reputation, maintain customer trust, and ensure your messages aren’t automatically flagged as spam by ISPs." [19]
Whether you’re sending transactional emails, marketing messages, or business communications, consistent monitoring is key to ensuring your emails reach their intended recipients. Adopting these practices will help you preserve a strong sender reputation and keep your email communications running smoothly.
FAQs
What steps can I take to keep my domain off blacklists?
Building a solid email reputation is key to steering clear of domain blacklisting. Start by setting up SPF, DKIM, and DMARC protocols – these help confirm the authenticity of your emails and reassure email providers. Keep your email lists clean by routinely verifying addresses and removing invalid ones. Avoid the temptation of using purchased lists, as they often lead to spam traps.
If you’re using new IPs, ease into it by gradually increasing your email volume and sticking to consistent sending patterns. This "warming up" process helps establish trust. Finally, keep a close eye on your domain’s reputation and engagement stats. Regular monitoring lets you spot and fix potential issues before they escalate.
What steps should I take if my domain is blacklisted?
If your domain ends up on a blacklist, the first step is figuring out which blacklists flagged it. After that, tackle the root of the problem. This might mean fixing SPF, DKIM, or DMARC records, cleaning up your email list, or stopping any practices that resemble spam-like behavior. Once you’ve addressed the issue, you can submit a delisting request to each blacklist.
To avoid similar problems down the road, consider using a monitoring tool like MailMonitor. These tools provide real-time alerts and help you track your domain’s recovery. Keeping a close eye on your sender reputation is key to making sure your emails land in inboxes where they’re meant to be.
How can tools like MailMonitor simplify domain blacklist monitoring?
Automated tools such as MailMonitor simplify the process of keeping an eye on domain blacklists by constantly scanning hundreds of DNS-based blacklists. If your domain or IP gets flagged, these tools send immediate alerts, giving you the chance to tackle the problem right away – before it affects your email deliverability.
MailMonitor goes a step further by offering practical solutions and managed services to help you resolve blacklist issues efficiently. This ensures you can protect your sender reputation and keep your emails landing in inboxes instead of being diverted to spam folders.
