
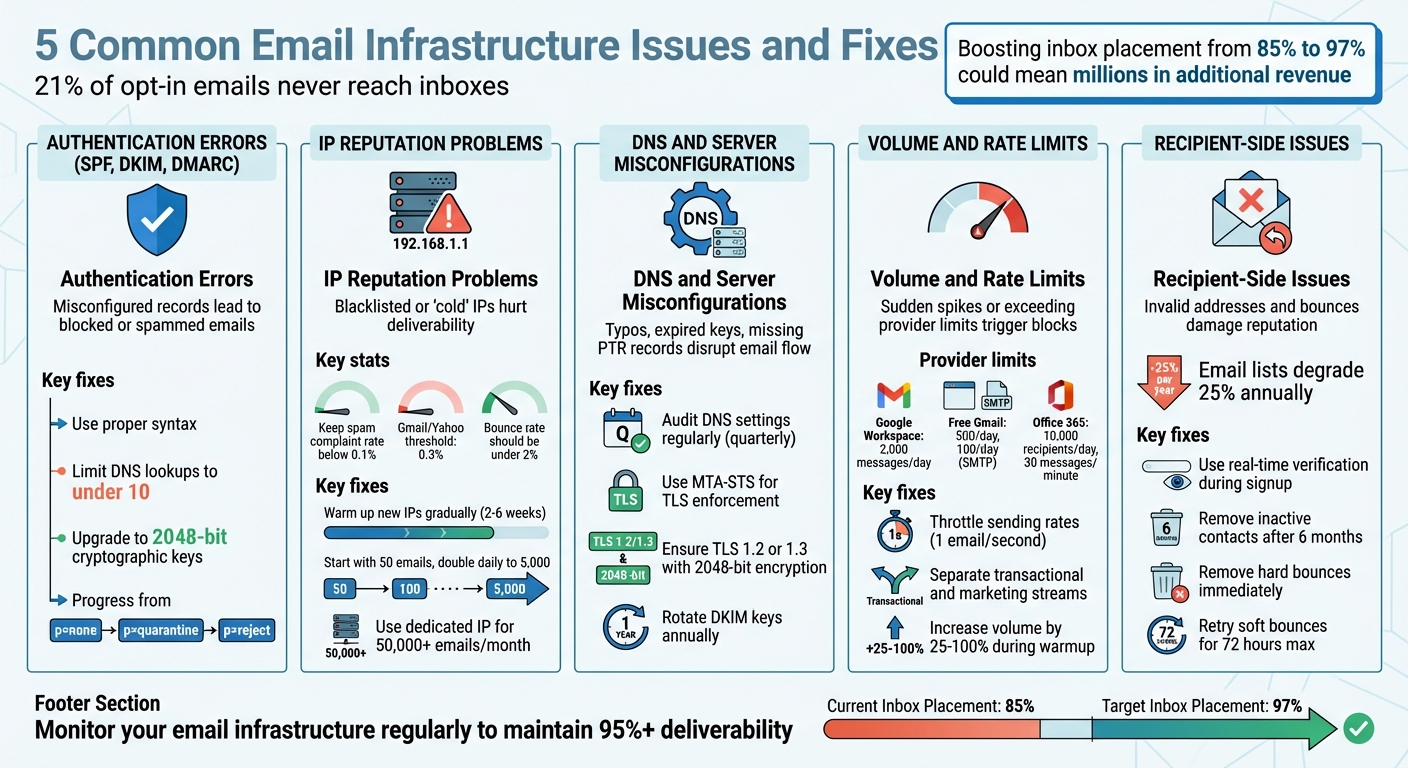
Struggling with email deliverability? You’re not alone – 21% of opt-in emails never reach inboxes, costing businesses time and money. This guide breaks down five common email infrastructure problems and their solutions, helping you improve inbox placement and safeguard your sender reputation.
Key Issues and Fixes:
- Authentication Errors (SPF, DKIM, DMARC): Misconfigured records lead to blocked or spammed emails. Fix by using proper syntax, limiting DNS lookups, and upgrading to stronger cryptographic keys.
- IP Reputation Problems: Blacklisted or "cold" IPs hurt deliverability. Address root causes, warm up new IPs gradually, and monitor complaint rates.
- DNS and Server Misconfigurations: Typos, expired keys, or missing PTR records disrupt email flow. Regularly audit DNS settings and use MTA-STS for TLS enforcement.
- Volume and Rate Limits: Sudden spikes or exceeding provider limits trigger blocks. Throttle sending rates and segment email streams to maintain consistency.
- Recipient-Side Issues: Invalid addresses and bounces damage reputation. Use real-time verification, remove inactive contacts, and monitor feedback loops.
Why It Matters:
Boosting inbox placement from 85% to 97% could mean millions in additional revenue for email-driven businesses. Fixing these issues ensures your emails land where they should – your customers’ inboxes.
Let’s dive into the solutions.
5 Common Email Infrastructure Issues: Problems and Solutions
Email Deliverability and Infrastructure with Vaibhav Namburi | Smartlead Office Hours
Issue 1: Incorrect Email Authentication Setup
SPF, DKIM, and DMARC are essential tools for verifying email legitimacy. If they’re not set up correctly, your emails might get blocked, land in spam folders, or leave your domain vulnerable to phishing attacks.
"Without SPF records, anyone would be able to send spoofed emails pretending to be from your domain, and there would be no way to verify their claims." – Cameron Henry, Enterprise Technical Account Manager, Sinch Mailgun [10]
SPF specifies which mail servers can send emails for your domain. DKIM uses cryptographic signatures to verify that emails haven’t been tampered with. DMARC ties SPF and DKIM together, instructing recipient servers on how to handle emails that fail authentication – whether to quarantine, reject, or allow them.
SPF Record Errors
SPF missteps are common but avoidable. You should only have one v=spf1 record per domain listing all authorized email sources [5][7].
Another critical point is to keep DNS lookups under 10 per record. Exceeding this limit – often caused by too many include: statements – will result in silent authentication failures [6][7].
Avoid the +all qualifier, as it allows any server to send emails on your behalf [6]. Instead, use ~all (soft fail) during testing and switch to -all (hard fail) once you’re confident in your setup [5][6].
How to Fix:
Combine all authorized senders into a single SPF record. Use SPF flattening tools to replace multiple include: statements with direct IP addresses [7]. For domains that don’t send emails, publish a "deny all" record: v=spf1 -all [9].
DKIM Alignment and Key Expiry
For DKIM to work, your email header’s selector must match the one in your DNS record [5][8]. If your mail server uses selector1 but your DNS record lists selector2, authentication will fail.
Another issue is outdated or weak cryptographic keys. Keys smaller than 1024 bits are considered insecure, with 2048 bits being the current standard [8]. Shorter keys make it easier for attackers to forge emails that appear authentic.
Even DNS formatting can cause problems. Public DKIM keys are long strings, and some DNS hosts split or truncate them, leading to verification failures [5].
How to Fix:
Ensure your mail server’s selector matches your DNS records. Upgrade to 2048-bit RSA keys and rotate them regularly to minimize risk if compromised [8][10]. Keep in mind that DNS changes can take 24–48 hours to propagate fully [8].
DMARC Policy Configuration
DMARC builds on SPF and DKIM to enforce consistent email authentication policies. However, syntax errors, such as typos or improper formatting, can render your DMARC record useless. Always include v=DMARC1 and separate fields with semicolons [8].
"One small typo, and suddenly your instructions make no sense to receiving mail servers." – Alyssa Harmon, Sr. Content Marketing Manager, Valimail [8]
Alignment failures are another stumbling block. DMARC requires that the domain in your "From" header matches the domain authenticated by SPF and/or DKIM [6][8]. If your email marketing platform uses its own domain in authentication fields, DMARC will fail – even if SPF and DKIM pass.
Many organizations leave their DMARC policy at p=none, which only monitors email activity without providing any protection. While this is helpful for gathering data, it does nothing to block spoofed emails. To protect your domain, you need to move to p=quarantine or p=reject.
| DMARC Policy | Action Taken by Receiver | Purpose |
|---|---|---|
p=none |
No action; email is delivered as usual. | Monitoring and data collection. |
p=quarantine |
Email is sent to the recipient’s spam/junk folder. | Flags unauthenticated mail as suspicious. |
p=reject |
Email is blocked and not delivered. | Provides the highest level of protection. |
How to Fix:
Start with p=none to collect aggregate reports (RUA) and identify legitimate senders [5][6]. Review these reports to detect unauthorized senders or configuration issues. Once you’re confident that legitimate emails are passing, shift to p=quarantine and eventually to p=reject for full protection [5][10]. If you use third-party email platforms, ensure they sign emails with your domain to maintain proper alignment [8].
Issue 2: IP Address and Sender Reputation Problems
Building and maintaining a strong IP reputation is critical. Even with proper authentication, a poor IP score can severely impact email deliverability.
Blacklisted IP Addresses
Spam filters flag IPs when certain sending behaviors trigger spam detection mechanisms. Issues like spam traps, high complaint rates, and excessive bounce rates can lead to blacklisting. For instance, a spam complaint rate above 0.3% will push your emails into spam folders at Gmail and Yahoo. A healthier rate should remain below 0.1% [1][13].
"Sending email to people who never explicitly gave you permission is not a good idea… the technical consequences are immediate and severe." – Tomasz Chwesewicz, Technical Content Writer, Mailtrap [1]
If your IP gets blacklisted, the first step is identifying the blocklist that flagged it. Tools like Spamhaus, Barracuda, or SpamCop can help with this [1]. Before requesting removal, address the root causes – clean your email list by removing inactive subscribers, use double opt-in for signups, and ensure your authentication records (SPF, DKIM, and DMARC) are accurate. When submitting a delisting request, clearly outline the corrective actions you’ve taken. Afterward, monitor your metrics closely and keep sending volumes low initially to avoid being flagged again.
To prevent future blacklisting, maintain good list hygiene. Use CAPTCHA to block bots, remove inactive addresses after 90 days, and verify email addresses in real time during signups. Segment your email streams by using separate subdomains for different purposes – for example, receipts.yourdomain.com for transactional emails and news.yourdomain.com for marketing campaigns. This separation safeguards critical messages.
Once blacklisting issues are resolved, focus on gradually warming up new IP addresses to rebuild your reputation.
IP Warmup Practices
New IP addresses lack history, and sending large volumes from a "cold" IP can mimic spammer behavior. This often results in throttling, spam folder placement, or outright blocks [11].
"A new IP address doesn’t have a reputation score since mail hasn’t been sent from it yet. A new IP is considered ‘cold.’ To earn a positive reputation, warm up your IP gradually." – Twilio SendGrid [11]
Warming up an IP typically takes 2 to 6 weeks, depending on the size of your audience [12]. Start by sending emails to your most engaged subscribers – those who have opened or clicked your emails in the last 30 to 90 days [11]. Begin with small volumes, such as 50 emails on Day 1, then 100 on Day 2, and 500 on Day 3. Gradually double the volume daily until you reach 5,000 emails per day. Beyond that, increase by about 50% daily while monitoring for any signs of blocks or complaints. If issues arise, pause or reduce your sending volume until metrics stabilize [11].
Consistency is key. Internet Service Providers (ISPs) value predictable sending patterns, so avoid sudden spikes in volume. If a dedicated IP remains inactive for over 30 days, you’ll need to re-warm it since most reputation systems reset after this period [11]. Before starting the warmup process, ensure that SPF, DKIM, and DMARC are fully configured [12]. Also, avoid using "noreply@" addresses in your "From" field – allowing replies signals ISPs that your emails are part of a legitimate conversation [3].
Regularly monitor your sending metrics to catch any early signs of reputation issues and maintain strong deliverability.
Shared vs. Dedicated IPs
Your choice between shared and dedicated IPs can significantly affect your sender reputation.
Shared IPs involve multiple senders using the same address. While cost-effective, this option carries the risk of being impacted by another sender’s poor behavior. However, shared IPs come pre-warmed, so there’s no need for gradual volume increases.
Dedicated IPs, on the other hand, give you full control over your reputation since you’re the only sender. However, this also means you’re solely responsible for maintaining it. Dedicated IPs are generally better suited for senders who exceed 50,000 emails per month [11]. For lower volumes, a dedicated IP may appear inactive, which can negatively affect its reputation.
| Feature | Shared IP | Dedicated IP |
|---|---|---|
| Control | Limited; shared with multiple senders | Exclusive to one sender |
| Reputation Risk | Affected by others’ behavior | Only influenced by your actions |
| Warmup Required | No; already pre-warmed | Yes; gradual warmup needed |
| Best For | Low-volume senders (<50,000/month) | High-volume senders (>50,000/month) |
| Cost | Lower; included in basic plans | Higher; part of premium plans |
"If you’re on a dedicated IP address, you’ll have a much clearer image of your email-sending reputation. But if you’re on a shared IP address, your email sending reputation may be impacted by others on your shared IP." – Litmus [14]
For those using dedicated IPs, consider setting up a secondary IP or subdomain for riskier campaigns, such as re-engagement or cold outreach, to protect the reputation of your primary IP. If you’re on a shared IP, ask your email provider how they manage shared reputations. Tools like MailMonitor can help you track your IP status across major mailbox providers, allowing you to address potential issues before they harm your deliverability.
Issue 3: DNS and Server Configuration Errors
DNS and server settings play a crucial role in ensuring your emails actually make it to recipients. Even small missteps in configuration can lead to authentication failures and delivery problems.
Incorrect DNS Records
To avoid issues, ensure you have a single SPF record with fewer than 10 DNS lookups. (Check Issue 1 for details on consolidating services and managing lookup limits.)
"A single typo or missing include can trigger a complete authentication failure." – MailTested Team [5]
MX records are another potential trouble spot. They must point to an A record (a hostname with an IP address) rather than a CNAME alias. Misconfigured MX records can result in undelivered emails [16].
For DKIM, make sure your DNS selectors match your email platform settings. Rotate your DKIM keys annually and use a minimum key strength of 2048-bit for added security [15].
DMARC setup can also trip you up. Common mistakes include omitting the underscore in the _dmarc hostname or forgetting semicolons between tags. Starting with a p=none policy lets you collect aggregate reports before moving to stricter policies like p=quarantine or p=reject [8].
Here’s a quick guide to common DNS errors and how to fix them:
| Record Type | Common Misconfiguration | Correction |
|---|---|---|
| MX | Pointing to a CNAME alias | Point the MX record to an A record (hostname with an IP address). |
| DKIM | Selector mismatch or expired keys | Ensure the DNS selector matches sender settings; rotate keys annually. |
| PTR | Missing or generic reverse DNS | Work with your ISP to map your IP to your domain (e.g., mail.example.com). |
Remember, DNS changes can take up to 48 hours to propagate [15]. It’s a good idea to review your DNS records quarterly, especially after switching platforms or integrating new services.
SSL/TLS Certificate Management
Valid SSL/TLS certificates are essential for securing email transmissions and maintaining deliverability [18]. Certificates must be signed by a trusted Certificate Authority, unexpired, and match the MX record hostname.
"Inconsistent or missing TLS can trigger warnings in Gmail and lead to outright rejections at stricter organizations, hurting both your security and your deliverability." – Tomasz Chwesewicz, Technical Content Writer, Mailtrap [1]
Outdated protocols like SSL v3 should be disabled. Modern email security requires TLS 1.2 or TLS 1.3, with encryption keys of at least 2048-bit [18]. Automating certificate renewals can help you avoid unexpected expirations, and the Common Name (CN) or Subject Alternative Name (SAN) in your certificate should match your MX hostname. Using MTA-STS ensures TLS enforcement, protecting against downgrade attacks [18].
BIMI and PTR Records
PTR records are vital for building email trust. Each sending IP must map to a domain you control. Missing or mismatched PTR records often lead to emails being flagged as spam or outright rejected [17].
"PTR records are key to email trust… Without them, emails can be flagged, rejected, or lost in spam filters." – InboxDoctor [17]
Your ISP or hosting provider typically manages PTR records, so it’s worth confirming that every sending IP has a valid PTR record.
For BIMI (Brand Indicators for Message Identification), you’ll need a strong DMARC policy (p=quarantine or p=reject) and a properly hosted SVG logo [20]. The logo should be square, under 32 KB, and published via HTTPS. Add the BIMI TXT record to your DNS. Some providers, like Gmail, also require a Verified Mark Certificate (VMC) to display the logo, ensuring it’s a registered trademark [19].
Tools like Google Postmaster Tools or MailMonitor can help you monitor your authentication settings and detect accidental changes. This way, you can address potential issues before they affect your email deliverability.
sbb-itb-eece389
Issue 4: Exceeding Email Volume and Rate Limits
Beyond having solid authentication measures in place, keeping email volume under control is crucial for maintaining good deliverability. Sending too many emails too quickly can set off spam filters and damage your sender reputation. Email providers impose strict volume limits to prevent abuse, and exceeding those – whether intentionally or not – can lead to deferrals, blocks, or long-term delivery problems.
For businesses sending large volumes of email, the stakes are high. For example, increasing inbox placement rates from 85% to 97% could mean an extra $1.4 million in annual revenue for a $10 million email-driven program [23].
Managing Sending Volume
Each email provider has specific daily and hourly sending limits. For instance:
- Google Workspace: 2,000 messages per day
- Free Gmail accounts: 500 messages per day via browser, 100 via SMTP [22]
- Office 365: 10,000 recipients daily, with a limit of 30 messages per minute [22]
Exceeding these limits can trigger error messages like "Error 454 Throttling failure: Maximum sending rate exceeded" [24].
When setting up new email infrastructure, gradually warming up your IP address is critical. Start with small daily volumes and increase them by 25% to 100% over time to establish a strong sender reputation [23][4]. If you notice messages being deferred, scale back your sending and monitor performance closely [4].
"Inbox providers are quick to punish and they take a long time to forgive." – Twilio SendGrid [21]
Another best practice is to separate email streams. Use different IP addresses or subdomains for transactional emails (like order confirmations or password resets) and marketing emails. This prevents low engagement rates from marketing campaigns from affecting the deliverability of critical transactional messages [21][25]. Twilio SendGrid advises that businesses sending over one million emails a month should use at least two dedicated IP addresses to properly manage segmentation [21].
To protect your sender reputation, aim to keep your bounce rate below 2% and your spam complaint rate under 0.1% [23]. Providers like Google and Yahoo enforce a strict spam complaint threshold of 0.3%, and exceeding it can result in immediate filtering or blocks [4][26].
Avoiding Spam Triggers
In addition to managing volume, avoiding sudden spikes in sending activity is essential. Abrupt increases – especially from new or dormant IPs – can resemble spam-like behavior and raise red flags with ISPs [23]. A steady, consistent sending schedule helps build trust and reduces the risk of greylisting, where ISPs temporarily reject emails to test the sender’s legitimacy [23].
When ramping up volumes, use throttling techniques in your Mail Transfer Agent (MTA), pacing emails at about one per second to avoid triggering alarms [4][24].
To maintain engagement metrics, implement sunsetting policies that stop sending emails to inactive recipients after 3–6 months [21]. With low engagement being the top deliverability issue for 16.4% of businesses [23], regularly cleaning your email list is a must.
You can also improve engagement by letting recipients choose how often they want to hear from you [21]. And instead of using "no-reply" email addresses, opt for monitored ones. Encouraging replies not only builds trust but also increases the chances of your emails landing in inboxes, as many providers automatically add reply addresses to contact lists [3].
Issue 5: Recipient-Side Problems and Invalid Addresses
Even with a flawless email infrastructure, issues on the recipient’s end – like full mailboxes, incorrect addresses, or strict security policies – can disrupt delivery. While these challenges are often beyond your control, failing to address them can harm your sender reputation.
Email lists naturally degrade over time, losing up to 25% of addresses annually as people change jobs, abandon accounts, or switch providers [29]. A bounce rate under 2% is considered healthy, but anything above 5% signals major list quality problems [27]. Below, we’ll explore how to verify addresses and handle bounces and complaints to maintain your sender reputation.
Email Address Verification
Invalid email addresses can severely impact your sender score. Hard bounces – permanent failures caused by errors like typos (e.g., "@gamil.com"), closed accounts, or non-existent domains – should be removed immediately [27].
Some subscribers use temporary or disposable email addresses that quickly expire, while role-based addresses like "info@" or "admin@" often see low engagement and may eventually bounce if left unchecked [28][1].
To ensure valid addresses, use double opt-in methods to confirm both the accuracy of the address and the recipient’s interest [1]. Real-time verification during signup can catch typos on the spot, offering suggestions like "Did you mean gmail.com?" [28]. Advanced verification tools can also identify problematic addresses, such as spam traps or abuse-prone accounts [30].
"Senders shouldn’t be holding on to dormant accounts in the first place. Removing them regularly prevents you from getting bounces."
– Marcel Becker, Yahoo [28]
Make it a habit to remove subscribers who have been inactive for more than six months [1]. This not only improves engagement but also helps you steer clear of "recycled" spam traps – old addresses repurposed by ISPs to catch senders neglecting proper list hygiene [3].
Handling Bounces and Complaints
Once addresses are verified, managing bounces and complaints effectively is key to preserving deliverability. Hard bounces, which indicate permanent delivery failures, should be removed immediately. Soft bounces, on the other hand, are temporary issues, like a full mailbox or a server outage. Retry delivery for up to 72 hours, but if an address soft bounces three times in a row, treat it as a hard bounce and suppress it [1].
| SMTP Code | Meaning | Bounce Type | Recommended Action |
|---|---|---|---|
| 5.1.1 | User unknown / Invalid address | Hard | Remove immediately |
| 5.2.2 | Mailbox full | Soft | Retry for 72 hours; suppress if persistent |
| 4.4.1 | Server busy / Connection timeout | Soft | Automatically retry |
| 5.7.1 | Blocked for policy reasons | Policy Block | Review content and authentication |
Spam complaints are even more damaging than unsubscribes. Keep your complaint rate below 0.1% – that’s fewer than one complaint per 1,000 emails [3]. Rates between 0.3% and 0.5% can severely damage your sender reputation [1]. Suppress any recipient who marks your email as spam immediately.
To stay ahead, use ISP feedback loops such as Google Postmaster Tools and Microsoft SNDS to monitor when your emails are flagged as spam [1]. Make it easy for users to unsubscribe with a clear, one-click option – this reduces the chances of frustrated recipients marking your emails as spam [1]. Avoid "no-reply" email addresses; using a monitored "From" address encourages two-way communication and may improve deliverability. Some ISPs, like Gmail, even whitelist senders whose recipients reply to their emails.
Lastly, set up stop-loss rules to automatically pause campaigns if there’s a sudden surge in bounces or complaints within 24 hours [30]. This gives you time to identify and resolve issues before they escalate further.
Building a Monitoring and Prevention Strategy
Addressing email infrastructure problems after they occur can be costly and time-consuming. A smarter approach? Spotting and resolving issues early with consistent monitoring and periodic system checks.
Monitoring Tools
Daily monitoring is what sets reliable senders apart from those struggling with deliverability problems. For Gmail senders, Google Postmaster Tools is a must. It provides real-time insights into your domain reputation, authentication success rates, and spam complaint trends [1]. If you’re working within Microsoft’s ecosystem, tools like SNDS (Smart Network Data Services) and JMRP (Junk Mail Reporting Program) are invaluable for understanding how Outlook and Hotmail evaluate your sending practices [1].
Platforms like MailMonitor can test inbox placement before you send a full campaign, showing whether your emails end up in the inbox, promotions tab, or spam folder. It also offers features like DMARC reporting and IP reputation monitoring, helping you catch authentication failures or reputation dips as they happen.
In addition, running weekly blacklist checks using tools such as Spamhaus Blocklist Lookup and MXToolbox can help you detect listings early. Early detection allows you to address issues before they cause major damage. These tools form the backbone of a proactive monitoring strategy, ensuring your email infrastructure remains strong.
Regular Infrastructure Audits
Conducting in-depth deliverability audits at least once every quarter is crucial [32]. During these audits, confirm that your SMTP setup uses Port 587 with TLS encryption instead of the often-blocked Port 25 [32]. Make sure all sending IPs have valid reverse DNS (PTR) records.
"Email deliverability isn’t ‘set and forget.’ Even strong programs run into bounces, blocks, or spam placement that hurt results."
– Tomasz Chwesewicz, Technical Content Writer, Mailtrap [1]
Authentication checks are equally important. Ensure your SPF records stay under the 10-lookup limit, use 2048-bit keys for DKIM signatures, and gradually move your DMARC policies from p=none to p=reject as your authentication framework strengthens [8]. While most senders average a delivery rate of about 85%, top-performing senders consistently hit 95% or higher [32]. Also, review your contact acquisition practices and remove inactive subscribers. A bounce rate above 2% is a red flag for deliverability issues [33].
Once regular audits are in place, automated alerts can serve as an additional safety net.
Automated Alerts and Reporting
Automated alerts are critical for addressing urgent issues. Use webhooks from your email service provider to receive real-time notifications for events like hard bounces, spam complaints, and authentication failures [31]. Even a spam complaint rate as low as 0.1% can prompt an ISP to block your emails [3].
Keep an eye on key SMTP error codes such as 421, 550, and 554 to quickly identify and resolve sending problems [1]. Use the rua tag in your DMARC records to get aggregate reports that highlight unauthorized IPs trying to send emails on your behalf [8][9]. For better tracking, tag your email streams based on type – like password resets, receipts, or notifications [31]. Additionally, separating your sending streams by subdomains for transactional and promotional emails ensures that issues with marketing campaigns don’t interfere with critical system messages [34].
Conclusion
The strategies covered earlier are the foundation of a reliable email infrastructure. When email infrastructure is neglected, it directly impacts delivery rates. In fact, a large percentage of opt-in emails never make it to the inbox [3], and the financial toll of poor infrastructure can quickly snowball into lost revenue.
The difference between achieving a stellar 95% deliverability rate and falling below 90% often comes down to consistent monitoring and proper setup [2]. Regularly checking authentication protocols, conducting audits, and tracking reputation in real time can stop small problems – like SPF misconfigurations or increasing bounce rates – from turning into bigger headaches. Catching these issues early saves both time and effort in recovery.
To stay ahead of potential delivery challenges, tools like MailMonitor are invaluable. It offers reputation tracking, inbox testing, and automated alerts to help you address problems before they escalate. By monitoring sender scores (on a scale from 1 to 100), testing emails prior to sending, and isolating marketing traffic through subdomain monitoring, you can tackle issues proactively – long before internet service providers start blocking your messages [35][36].
FAQs
What should I do if my IP address is blacklisted?
If your sending IP has been blacklisted, the first step is to confirm the listing and figure out what caused it. Common culprits include high bounce rates, spam complaints, missing authentication records (like SPF, DKIM, or DMARC), or an improperly configured reverse DNS. You can use a DNS-BL lookup tool to identify the root of the problem.
Here’s how to address the issue:
- Clean up your email list: Remove invalid addresses and contacts who aren’t engaging with your emails.
- Verify your authentication setup: Double-check that SPF, DKIM, and DMARC records are in place and that your reverse DNS is correctly configured.
- Warm up your IP: Start with smaller campaigns sent to your most engaged recipients to rebuild trust.
- Request delisting: Reach out to the blacklist operator with details about the steps you’ve taken to resolve the issue.
Once your IP is delisted, focus on maintaining a strong reputation. Keep your email list current, send permission-based content that adds value, and monitor for any new blacklist entries. Regular oversight and good practices will help ensure your emails reach their intended inboxes.
What is the best way to warm up a new IP address for email sending?
Warming up a new IP address is all about earning the trust of Internet Service Providers (ISPs). Start small by sending emails to your most engaged contacts – those who regularly open and interact with your messages. Begin with a few hundred to a few thousand emails and gradually increase the volume by 10–20% each day, as long as the engagement remains positive. Keep an eye on key metrics like bounce rates and complaints, and avoid sudden spikes in sending volume. Consistency in your sending schedule is crucial for a smooth warm-up process.
A solid technical foundation is equally important. Make sure to configure SPF, DKIM, and DMARC for your domain. Using a dedicated subdomain for marketing emails and maintaining a clean, permission-based email list can significantly boost your reputation. These practices, paired with consistent sending habits, help improve inbox placement over time. Tools like MailMonitor can simplify the process by automating reputation tracking and list management, making it easier to build trust with ISPs efficiently.
What are the best ways to manage email bounce rates and protect my sender reputation?
Keeping email bounce rates low is key to maintaining a solid sender reputation. First, it’s important to recognize the two types of bounces. Hard bounces happen when an email address is invalid or doesn’t exist – these should be removed from your list right away. On the other hand, soft bounces occur due to temporary issues, like a full inbox, and can be retried a few times before you consider removing them.
To minimize bounces, focus on maintaining a clean email list. Use double opt-in sign-ups to ensure subscribers genuinely want to hear from you, run routine email verification checks, and promptly remove hard-bounced addresses after each campaign. You can also reduce risks by segmenting your audience – send lower-risk emails to new or less active contacts. Additionally, authenticate your emails with SPF, DKIM, and DMARC protocols to establish trust with internet service providers (ISPs).
Don’t forget to keep a close eye on your bounce rates and sender reputation. Tools like MailMonitor can be incredibly helpful in spotting potential problems early, verifying email addresses, and ensuring your emails reach the inbox instead of the spam folder.
