
Your sender reputation is like a credit score for email marketing – it determines if your emails reach inboxes or end up in spam. Nearly 20% of emails fail to reach recipients due to poor reputation, impacting your campaigns and ROI. Here’s what you need to know:
- What is sender reputation? It’s a score used by ISPs (like Gmail and Outlook) to evaluate your email-sending practices. Factors include bounce rates, spam complaints, and user engagement.
- Why it matters: A low reputation means fewer emails delivered, lower open rates, and lost revenue.
- Key factors: Keep bounce rates below 0.3%, spam complaints under 0.1%, and ensure proper email authentication (SPF, DKIM, DMARC).
- How to check: Use tools like MailMonitor (paid, full-service), Sender Score (free, IP-focused), or Google Postmaster Tools (free, Gmail-specific).
- Improvement tips: Clean your email list, segment audiences, monitor metrics regularly, and fix authentication protocols.
Quick takeaway: Regular monitoring and addressing issues promptly can improve your email deliverability and engagement. Tools like MailMonitor can provide expert support for long-term results.
How To Check Your Sender Reputation: The Methods That Actually Work
Tools for Checking Sender Reputation
Once you understand the factors influencing your sender reputation, it’s time to explore tools that can help you monitor it. Using the right tools ensures you can identify and address deliverability issues before they escalate.
Using MailMonitor for Comprehensive Monitoring
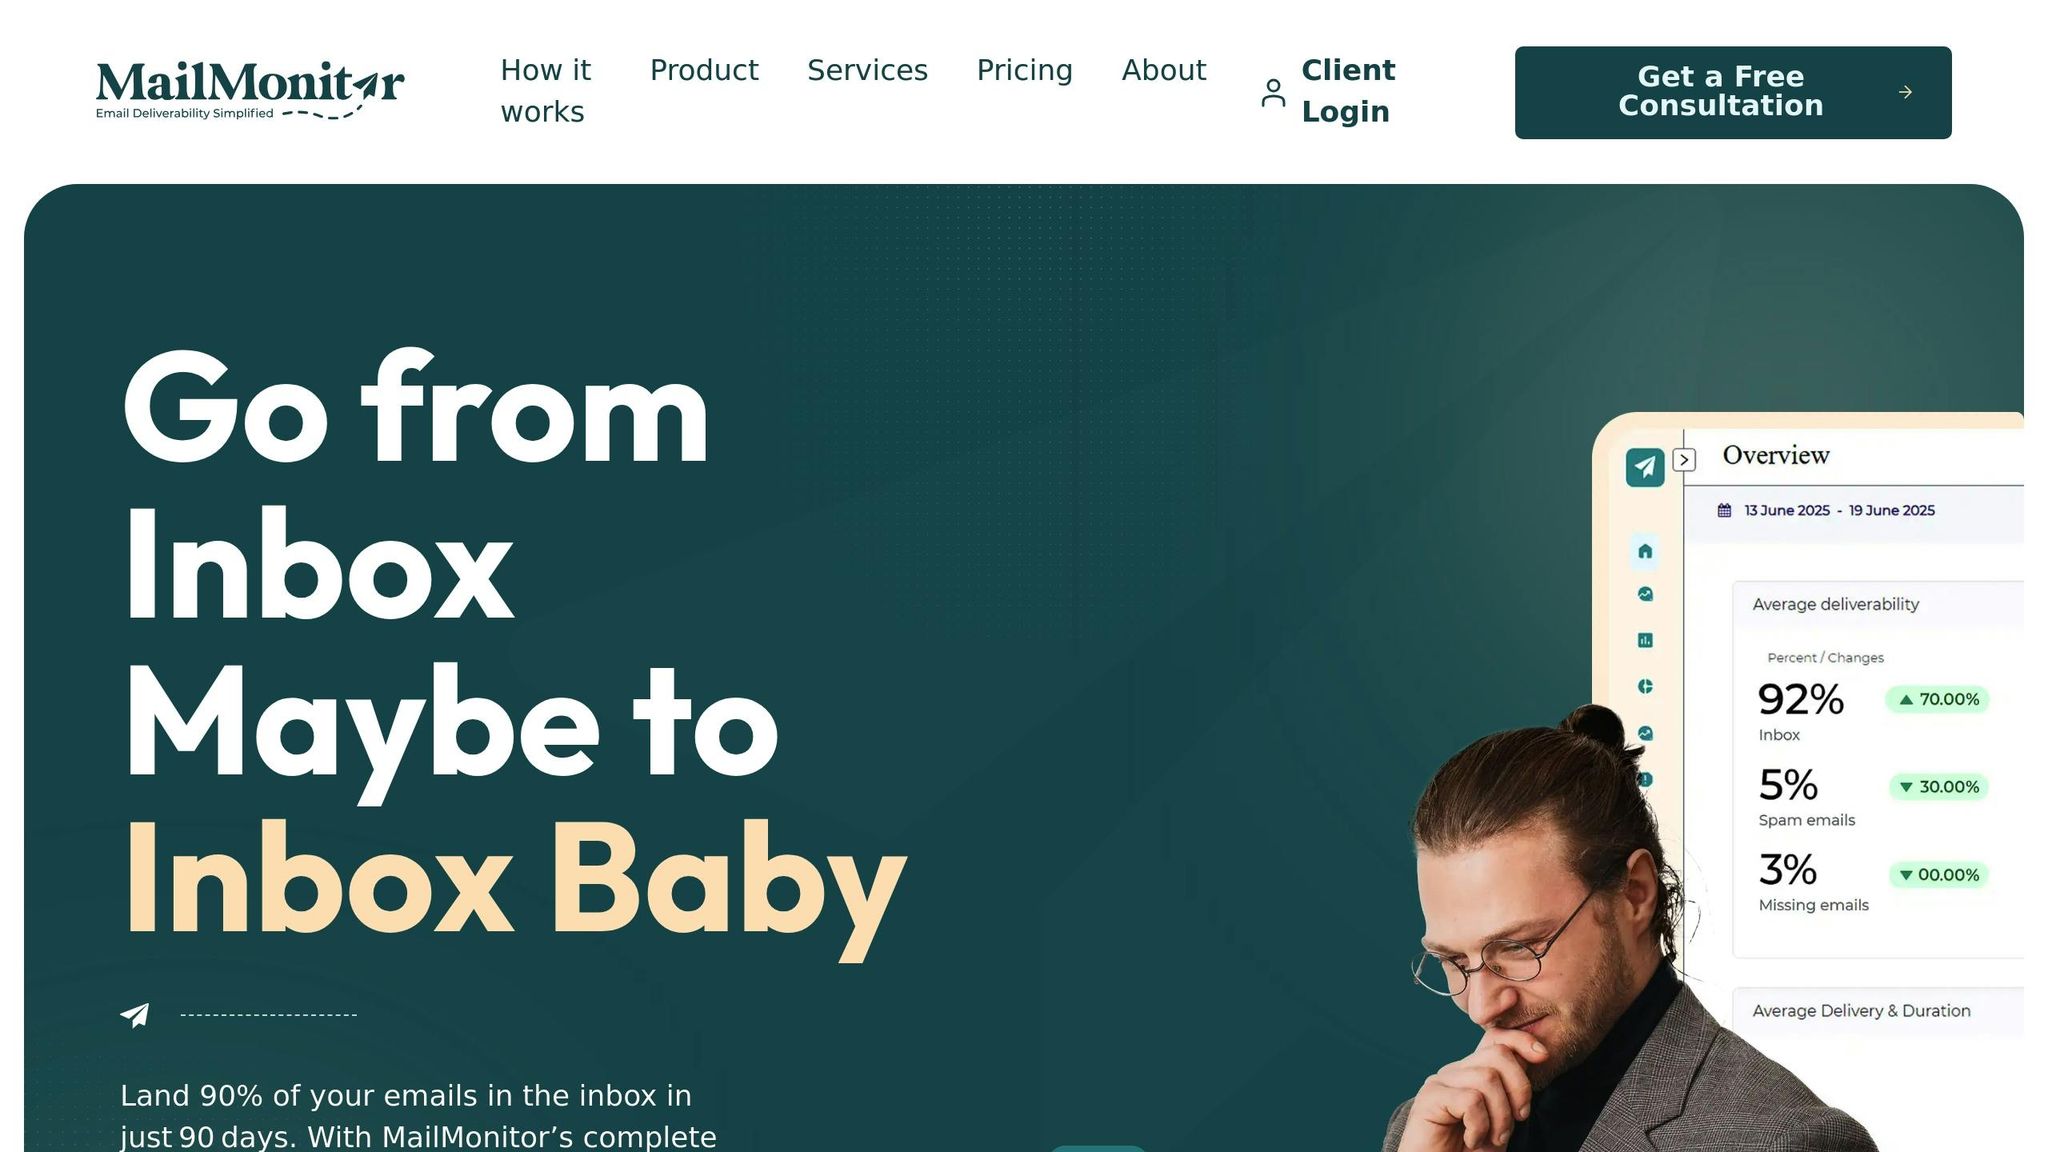
MailMonitor is more than just a reputation scoring tool – it’s a full-scale solution designed to give you a clear picture of your email deliverability. By tracking emails across over 400 real inboxes, it provides precise data on where your messages land [1]. This real-world testing approach offers insights that theoretical scores simply can’t replicate.
What sets MailMonitor apart is its ability to provide actionable insights. Instead of just presenting numbers, it helps pinpoint why emails might be flagged as spam. The platform conducts detailed audits of your email setup, revealing the root causes of deliverability problems [2].
Another standout feature is its managed services. Unlike purely self-service tools, MailMonitor offers expert guidance. Dan Westenskow, CEO of Fusion HCS, highlights its value:
"MailMonitor helps us identify and fix our spam issues. It’s like having a deliverability expert on our team. The weekly check-in calls allow us to take feedback, implement it, and then follow up the next week with additional items to clarify or get help with. This cadence helps our team get better email results." [1]
MailMonitor also provides real-time monitoring and automated alerts, ensuring you can act quickly if your reputation changes [2]. It even simulates email performance across different ISPs before you send your campaigns, giving you a proactive edge.
While MailMonitor offers a comprehensive approach, there are other tools that focus on specific areas of sender reputation monitoring.
Other Tools for Sender Reputation Analysis
If you’re looking for specialized insights, several tools focus on particular aspects of reputation monitoring. These can complement all-in-one platforms like MailMonitor.
- Sender Score: This free tool evaluates your IP address’s reputation based on performance. It provides a general view of how ISPs perceive your sending reputation but lacks the detailed insights needed for troubleshooting [2].
- Google Postmaster Tools: Designed for Gmail-specific traffic, this free platform gives domain and IP reputation insights. It tracks spam rates, authentication, and delivery errors, rating your reputation from "Bad" to "High" [3]. It’s especially useful if Gmail is a significant part of your email audience.
- Microsoft SNDS (Smart Network Data Services): If you send a lot of emails to Outlook or Hotmail users, this tool is invaluable. It monitors spam trap hits and complaint rates specifically for Microsoft email services [3].
- Barracuda Central: This tool provides real-time IP and domain reputation lookups, offering quick "good" or "poor" ratings. It’s ideal for immediate checks when you suspect a reputation issue [2].
- MxToolbox: Combining blacklist checks with domain health analysis, MxToolbox helps identify if your sending infrastructure is on any major blocklists. It also verifies DNS and authentication records, making it a great choice for technical troubleshooting [2].
Tool Comparison
Here’s how these tools stack up in terms of focus, cost, and best use cases:
| Tool | Primary Focus | Cost | Best Use Case |
|---|---|---|---|
| MailMonitor | Complete deliverability management | Paid | Comprehensive monitoring with expert support |
| Sender Score | IP reputation scoring | Free | Baseline reputation assessment |
| Google Postmaster Tools | Gmail-specific insights | Free | Gmail deliverability optimization |
| Microsoft SNDS | Outlook/Hotmail metrics | Free | Microsoft ecosystem monitoring |
| Barracuda Central | Real-time reputation lookup | Free | Quick reputation status checks |
| MxToolbox | Blacklist and DNS checking | Free | Technical infrastructure verification |
Free tools like Sender Score and Google Postmaster Tools are great for getting a baseline understanding of your reputation. However, they often require manual effort to interpret the data and don’t provide direct guidance on how to fix problems. Platforms like MailMonitor, on the other hand, combine multiple data sources with expert insights, offering a more proactive and guided approach to improving your email reputation [2].
Step-by-Step Guide to Checking Sender Reputation
Now that you’re familiar with the tools available, let’s break down the process of checking your sender reputation. These steps will guide you from setting up the necessary tools to analyzing actionable data, giving you a clear path to maintain and improve your email deliverability.
Step 1: Set Up Monitoring Platform Accounts
The first step is creating accounts on key monitoring platforms. Using a mix of free and paid tools gives you a broader perspective on your sender reputation.
For MailMonitor, the setup process is a bit different. Instead of signing up directly, you’ll need to request a free consultation on their website. This consultation connects you with experts who customize your monitoring based on your email-sending habits and business needs.
For free tools, sign up for Google Postmaster Tools and Microsoft SNDS using your business email. After registering, verify your domain and IP addresses. This usually involves adding a DNS TXT record or uploading an HTML file to your site, which may take 24–48 hours to complete.
Make sure you use your primary business email for registration and share access with relevant team members to streamline monitoring.
Step 2: Authenticate Your Domain
Authenticating your domain is key to getting accurate and reliable sender reputation data. Here are the three essential authentication protocols you’ll need:
- SPF (Sender Policy Framework):
Add a TXT record to your domain’s DNS that specifies which IP addresses are authorized to send emails on your behalf. For instance, if you’re using Google Workspace, your SPF record might look like this:
v=spf1 include:_spf.google.com ~all - DKIM (DomainKeys Identified Mail):
Generate a public-private key pair. The private key is managed by your email provider, while you’ll add the public key as a TXT record in your DNS. The record name typically looks like this:
selector._domainkey.yourdomain.com - DMARC (Domain-based Message Authentication, Reporting & Conformance):
Add a DMARC record to instruct receiving servers on how to handle emails that fail SPF or DKIM checks. Start with a monitoring policy like:
v=DMARC1; p=none; rua=mailto:[email protected]
This lets you collect reports without impacting email delivery. Once your setup is stable, you can move to stricter policies such as "quarantine" or "reject."
After updating these DNS records, allow 24–72 hours for them to propagate fully. Use a DNS lookup tool to confirm that your records are visible globally before proceeding.
Step 3: Review Key Metrics
Once your monitoring tools are set up, focus on the metrics that directly impact your sender reputation. These include:
- Bounce Rates:
Keep bounce rates below 0.3%. If they exceed 2%, it’s a sign of serious issues with your email list quality. - Spam Complaint Rates:
Aim for complaint rates under 0.03% (around 3 complaints per 10,000 emails sent). Tools like Google Postmaster Tools can show complaint data for Gmail users, while your email service provider (ESP) typically covers all platforms. - Engagement Metrics:
Open and click rates indicate how engaging your emails are. For reference, B2B emails often see open rates between 15% and 25%, while retail emails range from 20% to 30%. - Sender Score:
This score ranges from 0 to 100, with anything above 80 being good and over 90 considered excellent. Keep in mind it’s based on a rolling 30-day average, so recent improvements might not show up immediately. - Spam Trap Hits:
Even a small number of spam trap hits can damage your reputation, so monitor these closely.
Step 4: Set Up Regular Monitoring and Alerts
Once your setup and authentication are complete, regular monitoring is essential for maintaining healthy deliverability. Configure automated alerts for critical events like blacklistings, spikes in bounce or complaint rates, and failed authentication checks.
If you’re sending over 100,000 emails per month, daily checks are recommended. For smaller volumes, weekly reviews should suffice. Regardless of your volume, set up alerts to notify you immediately if any issues arise.
MailMonitor offers an alert system designed to align with U.S. business hours and communication preferences. Additionally, their deliverability experts can proactively identify potential problems before automated alerts catch them.
Keep a detailed record of your metrics over time, such as in a spreadsheet that tracks changes alongside campaign activities. Clearly define response procedures, including who should be alerted, the steps for escalation, and the actions needed to resolve issues. This preparation ensures your team can address any sender reputation problems quickly and effectively.
sbb-itb-eece389
How to Interpret and Improve Sender Reputation Metrics
Making sense of your sender reputation metrics – and knowing how to act on them – is crucial for keeping your email deliverability on track. Let’s dive into what healthy benchmarks look like and explore practical steps to address common issues.
Benchmarks for Key Metrics
Good sender reputation metrics act as an early warning system for potential issues. Here’s a quick breakdown of the benchmarks that separate successful email campaigns from those that struggle:
| Metric | Healthy Benchmark | Warning Level |
|---|---|---|
| Bounce Rate | < 0.3% | > 2% |
| Spam Complaint Rate | < 0.03% | > 0.1% |
| Sender Reputation Score | 80–100 | < 80 |
| Open Rate | > 20% | < 10% |
| Click Rate | > 2% | < 1% |
For example, bounce rates should stay under 0.3%. That means if you’re sending 10,000 emails, you should see fewer than 30 bounces. Anything above 2% signals poor list hygiene and needs immediate attention.
Spam complaint rates are even stricter. You’ll want fewer than 3 complaints per 10,000 emails. Rates above 0.1% can lead to your emails being flagged or blocked by platforms like Gmail or Outlook.
Sender reputation scores, measured on a 0–100 scale, are another key indicator. Scores above 80 are considered solid, with anything over 90 being excellent. Engagement metrics like open and click rates are also critical. For instance, B2B emails generally see open rates between 15% and 25%, while retail campaigns often hit 20% to 30%. If your engagement is low, it could mean your emails are landing in spam – even if your bounce rate looks fine.
These benchmarks help pinpoint where things might be going wrong and guide you toward solutions.
Common Causes of Poor Metrics
A drop in sender reputation is rarely due to a single issue. Common culprits include outdated email lists, inactive subscribers, misconfigured authentication settings, and erratic sending patterns.
Email lists naturally degrade over time – about 28% annually – as people change jobs, abandon old addresses, or stop engaging. Without regular cleaning, outdated emails can lead to hard bounces and even spam traps, both of which harm your reputation. Continuing to email inactive subscribers can also drag down engagement and increase the risk of hitting spam traps used by mailbox providers.
Technical missteps, like failing to configure SPF, DKIM, and DMARC records correctly, can cause your emails to be flagged as spam or rejected outright. Additionally, sudden spikes in email volume or inconsistent sending schedules can raise red flags with mailbox providers, who expect steady, predictable behavior from legitimate senders.
Tackling these issues head-on is essential to improving your metrics.
Steps to Improve Your Metrics
Once you’ve identified problem areas, here’s how you can turn things around:
- Clean your email list: Remove invalid and inactive addresses regularly. Using an email verification service can help minimize bounces. For example, one company cut its bounce rate from 12.3% to 2.1% in just two months by implementing an Email Verification API. This simple step boosted their deliverability by 34% and added $2.3 million in revenue.
- Segment your audience: Break your email list into smaller, targeted groups. Sending relevant content increases engagement, which in turn signals to mailbox providers that your emails are worth delivering.
- Fix authentication protocols: Double-check that your SPF, DKIM, and DMARC records are properly set up. Use DNS lookup tools to confirm everything is configured correctly, ensuring mailbox providers trust your emails.
- Monitor and act quickly: Keep a close eye on your metrics. Set up automated alerts to catch spikes in bounce or complaint rates before they become bigger problems.
If you’re looking for extra support, tools like MailMonitor can provide expert guidance. For instance, Fusion HCS improved inbox placement by 90% across 1 million contacts with MailMonitor’s help. Similarly, hubXchange saved $271,000 by resolving deliverability issues. As Nathan Merryfield, their Director of Marketing, put it:
"MailMonitor’s software is easy enough to understand for a beginner with little knowledge of email placement."
The goal isn’t to apply quick fixes but to focus on consistent, long-term improvements. By prioritizing list quality, delivering relevant content, and fine-tuning your technical setup, you’ll steadily build a stronger sender reputation and improve your email deliverability over time.
Best Practices for Managing Sender Reputation
Maintaining a strong sender reputation is like keeping a good credit score – it requires consistent monitoring and strategic effort. The most successful email marketers treat it as an ongoing priority, ensuring their reputation stays intact to maximize deliverability and engagement.
Regular Monitoring and Management
Keeping an eye on your sender reputation regularly is essential. For businesses sending high volumes of emails, daily checks are a must, while smaller-scale operations should review key metrics at least once a week[3]. This includes tracking the benchmarks mentioned earlier and verifying domain authentication protocols like SPF, DKIM, and DMARC. Technical issues can crop up unexpectedly, so staying vigilant is key.
Automated alerts are your safety net. Set them up to notify you of any unusual changes in metrics, so you can tackle potential issues before they spiral out of control. Also, don’t underestimate the importance of list hygiene. Email lists naturally degrade over time, with inactive subscribers and outdated addresses dragging down engagement and increasing the risk of hitting spam traps. Regularly cleaning your list helps prevent these problems.
Make Reputation Checks Part of Campaign Operations
Reputation monitoring shouldn’t be an afterthought – it needs to be baked into your campaign process. Before launching any campaign, review key metrics to ensure everything is in good shape. During the campaign, keep an eye on delivery rates and engagement in real time. Afterward, analyze the performance to identify trends and areas for improvement.
This integrated strategy helps you fine-tune your approach, from adjusting send times to refining audience segmentation and content strategies. By embedding these checks into your workflow, you create a feedback loop that drives continuous improvement and strengthens your sender reputation.
Optimize Deliverability with MailMonitor
Using automated tools can take your reputation management to the next level. MailMonitor, for example, offers a streamlined platform that simplifies the process through three key steps: audit, remediation, and optimization.
This tool not only provides in-depth insights but also pairs them with expert guidance to help you act on the data. For instance, hubXchange saved $271,000 by addressing their deliverability challenges through MailMonitor. As Nathan Merryfield, Director of Marketing at hubXchange, shared:
"MailMonitor’s software is easy enough to understand for a beginner with little knowledge of email placement. But what sets them apart is their hands-on support to maximize our deliverability." [1]
With a 90% inbox placement guarantee within 90 days[1], MailMonitor equips businesses with the tools and expertise to maintain a strong sender reputation and ensure long-term success.
Conclusion
Sender reputation forms the backbone of effective email marketing. With nearly 20% of emails failing to reach their recipients due to a poor reputation, it’s clear this isn’t just a minor inconvenience – it’s a critical business concern[4]. Emails flagged as spam remain unseen, cutting off opportunities for engagement, revenue, and stronger brand connections.
Key Takeaways
Think of sender reputation like a credit score: it takes time to build but can be damaged quickly. For high-volume senders, keeping an eye on key metrics daily is essential, while smaller operations should aim for weekly reviews to catch potential problems early[4]. Pay close attention to factors like bounce rates, spam complaints, and authentication protocols – all of which signal trustworthiness to ISPs.
Top-performing email marketers understand that reputation monitoring is an ongoing process, not a one-and-done task. The strategies outlined earlier show how to approach this systematically. Tools such as MailMonitor simplify the process by offering real-time insights across hundreds of inboxes, automated alerts for irregularities, and expert advice to resolve issues fast[1]. Businesses like Fusion HCS have seen 90% better inbox placement across 1 million contacts, while hubXchange saved $271,000 by improving deliverability – proof that managing your sender reputation pays off in more ways than one[1].
Ultimately, your sender reputation affects every part of your email marketing efforts, from getting into inboxes to driving engagement, conversions, and revenue. By adopting consistent monitoring habits and using advanced tools with expert support, you’re setting the stage for long-term success in email marketing.
FAQs
Why are my emails going to spam, and how can I improve my sender reputation?
If your emails keep ending up in spam folders, the culprit might be your sender reputation. Fixing this means keeping a close eye on your email performance, spotting any red flags, and addressing them promptly.
Tools like MailMonitor can be a game-changer. They let you track your sender reputation, check how often your emails actually land in inboxes, and pinpoint what might be dragging down your deliverability. By consistently testing and fine-tuning your email campaigns, you can boost the chances of your messages making it to the inbox instead of the spam folder. Plus, MailMonitor helps you stay ahead of potential issues, ensuring your sender reputation remains solid over time.
What are the best practices for keeping your email list healthy to improve deliverability?
Maintaining a healthy email list is key to making sure your messages land in the inbox where they belong. One of the first steps is to routinely clean up your list by removing invalid or inactive email addresses – this helps reduce bounces and keeps your list in good shape. Always stick to using double opt-in to ensure subscribers truly want your emails. And steer clear of buying email lists; these often include unengaged addresses or even spam traps that can hurt your sender reputation.
Pay close attention to your sender reputation and engagement metrics, like open rates, click-through rates, and bounce rates. These indicators can alert you to any issues early on. Prioritizing quality over quantity will not only strengthen your connection with your audience but also boost your email deliverability in the long run.
How can MailMonitor help identify and resolve email deliverability issues?
MailMonitor equips you with tools to keep a close eye on your email deliverability, making it easier to spot and fix issues that could send your emails straight to spam. By analyzing key sender reputation metrics, it helps you uncover potential problems before they impact your campaigns.
The platform provides detailed insights into inbox placement, spam triggers, and sender reputation. These insights give you the ability to tackle issues head-on, ensuring your emails land where they’re supposed to – your recipients’ inboxes. With its data-driven approach and practical support, MailMonitor helps boost engagement and optimize the overall performance of your email efforts.
